


Click here to see the first artist-impression of the car. |
|||||
| |||||
|
|
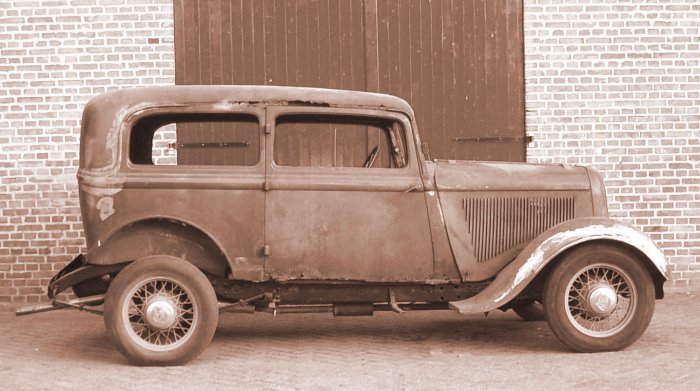
This is the first picture we took from the car (with a mobile phone, sorry...). When we finally had it on his spot in the workshop, I didn't do anything to it for 8 months. (had to get my Camino out of the shop and to the spraypainter first) |
||||
|
When I got started on the car, the first thing we did was roll the baby out and wash it.
When years of dirt were washed off, work could begin on the car. Because of the very bad shape of the body, I didn't dare to take it of the chassis rightaway, so I decided to do some work on the body first. With a chainhoist and a hydraulic repair kit I managed to get the body near it's original shape. (the lower part of both the left A-pillar and right B-pillar weren't connected to the body anymore...). After this time consuming job I braced the dooropenings and pillars to each other. Now I made new rockers for both sides, and got them in, even the A-pillar got connected again! The B-pillars both got an extra re-informent, just to be sure... |
|
||||
|
|
With the front of the body rigid again, I moved over to the rear wheeltubs. Due to some investment by M., I could roll my own tubs, so no need to rescue the old ones! 10 Minutes with the grinder, and off he went into the Vintage Tin Bin! |
||||
|
A few hours of welding and cursing later, both new wheeltubs and the rear part of the floorpan are in. So far for work inside the car. Now it's time to move out, and start working on the cosmetics... |
|
||||
|
|
Sorry... work's on hold right now. I'm currently working on my Impala, so now the Ply is used as storage. Good news, Works have started again on the Ply!!! (although she will be sharing my available time with the Model A) |
||||
|
The lower 4" of the passengerdoor were completely rusted, and needed a full new bottom First I reproduced a bottomplate, and welded that in place of the remainings of the old bottom (sorry no good picture of that...) Then I made a cardboard template of the much better driverside door skin, and made me a wooden buck to hammer the edge of the new door skin over. (picture shows replaced piece of the door skin, template and buck) After welding and waiting (letting the sheetmetal cool down between each spotweld) for approx. 2 hours, the edge of the skin got hammered and dollied over the lip of the new bottom to get (some of) the curve into the new sheetmetal. The driverside door only needed some minor patch work on one lower corner With both doors now being acceptable, I tried my luck on some more sheetmetal fabrication, but I think I would be better of finding/buying some ready made patch panels. For a novice in sheetmetal fabrication like me these multi curved panels like the lower cowl sections are not yet within my reach... |
|
||||
|
|
Just for the fun of it I placed my new engine (Daimler V8 baby Hemi) beside the Ply. It appears to be possible! :-) Also visible for the sharp observer is the fact that I did some repair work on the sheetmetal around the drip rails on this side of the car. One day I will be driving this car! |
||||
|
The patched above the passenger door welded, but not yet grinded / leaded. |
|
||||